No products in the cart.



You're probably here because a vial that looked “standard” turned out not to be standard at all.
That usually shows up in the worst way possible. A peptide solution drifts off-spec after sterilization. A reagent behaves differently from one batch to the next. A sample that should have been stable starts giving inconsistent analytical results, and the only variable anyone forgot to question was the container. In a busy lab, people focus on the compound, the buffer, and the protocol. They often assume the vial is just packaging.
It isn't. With 10 mL glass vials, the container can directly affect pH behavior, trace-element exposure, closure fit, light protection, and how reliably you can access the sample over time. That matters for peptides, analytical standards, lyophilized materials, and any workflow where reproducibility depends on controlling small variables before they become expensive problems.
A 10 mL glass vial sounds simple until you have to depend on it.
In practice, that label gets used for very different products. One listing may refer to a plain storage vial. Another may be a serum vial intended for crimp sealing. Another may come pre-sealed, amber, sterile, or fitted for repeated needle access. Capacity alone doesn't tell you whether the vial matches your workflow, and that confusion is one of the biggest reasons labs buy the wrong format in the first place, as noted in this discussion of the market gap around 10 mL vial selection criteria.

The first checkpoint is basic but important. Are you buying for storage, sterile fill, repeated puncture, lyophilization, transport, or analytical prep? A vial that works well for holding a dry reference material may be a poor choice for a peptide solution that will be refrigerated, punctured repeatedly, and expected to remain stable.
New researchers often shop by what they can see first:
Those visible differences matter, but they only help if they map to the actual use case. Amber is for light-sensitive materials. Crimp systems are often chosen when seal integrity matters more than convenience. Screw caps are usually easier for routine access. Pre-sealed formats can simplify handling, but they only work if the septum material is compatible with the sample.
Practical rule: Select the vial for the compound's behavior, not for the catalog photo.
The same principle shows up outside laboratory packaging. Small container formats often look interchangeable until portability, closure style, and material choice start affecting the actual use case. That's one reason consumer packaging discussions around convenient fragrance for life on the go are surprisingly useful. Size alone never tells the whole story.
Before anyone compares vendors, ask these questions:
What will contact the sample?
That includes the glass, liner, septum, and cap interior.
How will the sample be handled after filling?
Repeated puncture, refrigeration, autoclaving, light exposure, and transport all change the risk profile.
Researchers working with peptides tend to learn this quickly. The compound may be expensive, but the bigger cost is usually bad data. If the vial introduces variability, the experiment doesn't fail because the peptide was poor. It fails because the system around it wasn't controlled.
A lot of purchasing mistakes happen because people treat volume as the whole specification. It's only the starting point.
A 10 mL glass vial is often standardized as a 10H molded format under ISO 8362-4, and pharmaceutical glass is commonly classified as Type I borosilicate or Type III soda-lime based on hydrolytic resistance. The geometry matters because it affects closure fit and product stability. For older volumetric references, 1 dram is about 3.7 mL, so a 10 mL vial holds about 2.7 drams, which helps connect legacy terminology to modern packaging standards, according to West Pharmaceutical Services.
That standardization matters for more than paperwork. When a vial format follows recognized dimensions, you get better compatibility with stoppers, caps, handling equipment, racks, and filling procedures. When dimensions vary, the trouble shows up later as poor seal consistency, fit issues, or awkward integration with routine lab tools.
A 10 mL vial has a few core elements, and each one matters:
| Component | What to look for | Why it matters |
|---|---|---|
| Body | Molded or tubular glass, clear or amber | Affects chemical behavior, visibility, and light protection |
| Neck finish | Designed for screw cap or stopper/crimp system | Determines closure compatibility |
| Base and sidewall | Consistency and defect control | Influences handling stability and inspection |
| Headspace | Enough room above fill volume | Important for mixing, freeze-drying, or pressure changes |
| Closure interface | Uniform sealing surface | Reduces leakage and fit variability |
A practical mistake is assuming all 10 mL vials have the same usable fill behavior. They don't. The stated volume tells you the nominal capacity, but your workflow depends on headspace, neck design, and how the closure sits after sealing.
When I train new staff, I usually have them compare vials in this order:
That order prevents a common error. People often start with convenience, such as “I want a screw cap because it's easier,” and only later realize the material or closure liner isn't a good fit for the sample.
If a vial fits your hand well but doesn't fit your chemistry, it's the wrong vial.
The anatomy is simple on paper. In actual lab use, it's a chain of contact surfaces and dimensional tolerances. That's why experienced buyers don't ask only for “10 mL glass vials.” They ask what kind.
Glass type is the first decision that can influence the rest of the experiment.
A vial may be the right volume, the right color, and the right closure style, but if the glass chemistry isn't appropriate for the sample, that apparent match doesn't help. For sensitive materials, especially peptide solutions and high-value analytical reagents, the difference between Type I borosilicate and Type III soda-lime is not cosmetic.
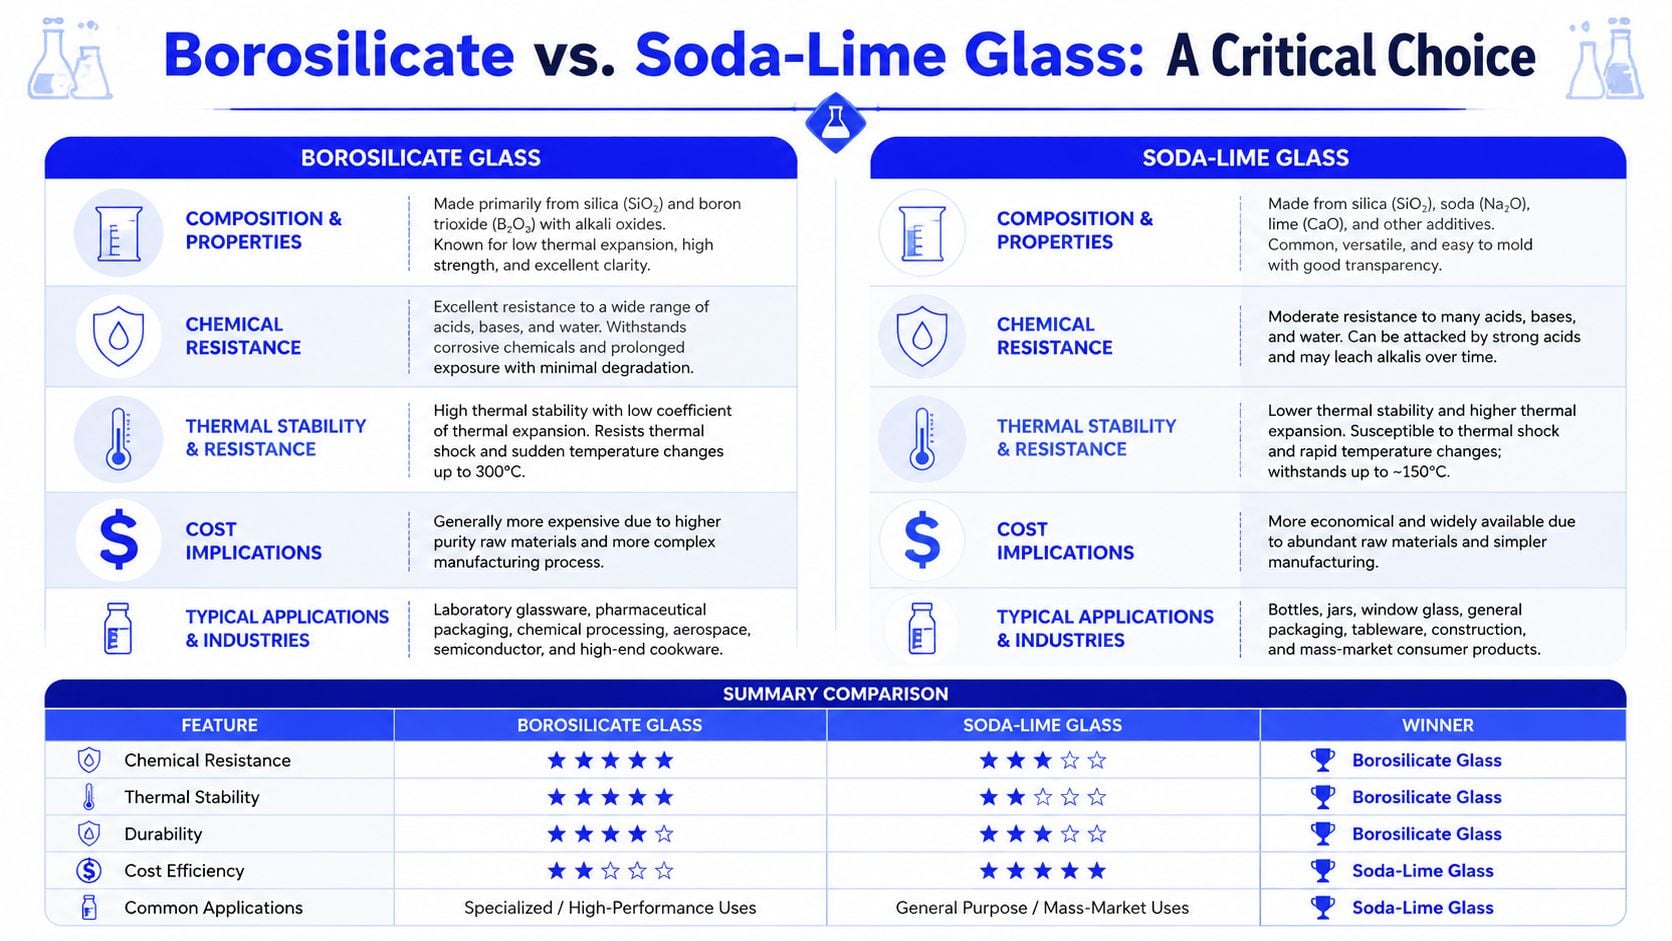
Type I borosilicate is generally the safer choice when the contents are sensitive to chemical interaction, sterilization stress, or subtle shifts in solution behavior. Labs prefer it because it is the more demanding option for demanding work.
Type III soda-lime can still be useful. It may be suitable where the contents are less reactive, less sensitive, or stored dry. The problem is that researchers often extend that logic too far. A vial that's acceptable for a stable dry compound may not be the right home for a water-based peptide preparation, a reagent that sees heat, or a material intended for repeated access.
Here's the practical comparison:
Type I borosilicate
Type III soda-lime
At this point, many “all glass is glass” assumptions fall apart.
The glass body gets most of the attention, but the closure decides how the sample meets the outside world.
A poor closure choice can undermine a good glass choice. If you need repeated needle entry, the septum has to reseal reliably. If you need a secure final seal, a crimp system often gives more confidence than a casually tightened cap. If you need quick bench access and low-friction handling, a screw cap may be the better fit.
Use this decision logic:
The right closure doesn't just keep the vial closed. It controls how contamination risk enters the workflow.
A lot of failed vial selections come from splitting the decision in the wrong place. People compare glass separately from caps, then buy them as if they were independent parts. In practice, vial body, stopper or liner, cap, and handling method form one system. If one piece is weak, the sample pays for it.
Researchers tend to notice closure systems only after they cause trouble. That's backward. The closure decides how the sample is protected, how you access it, and how many times you can do that without degrading the seal.
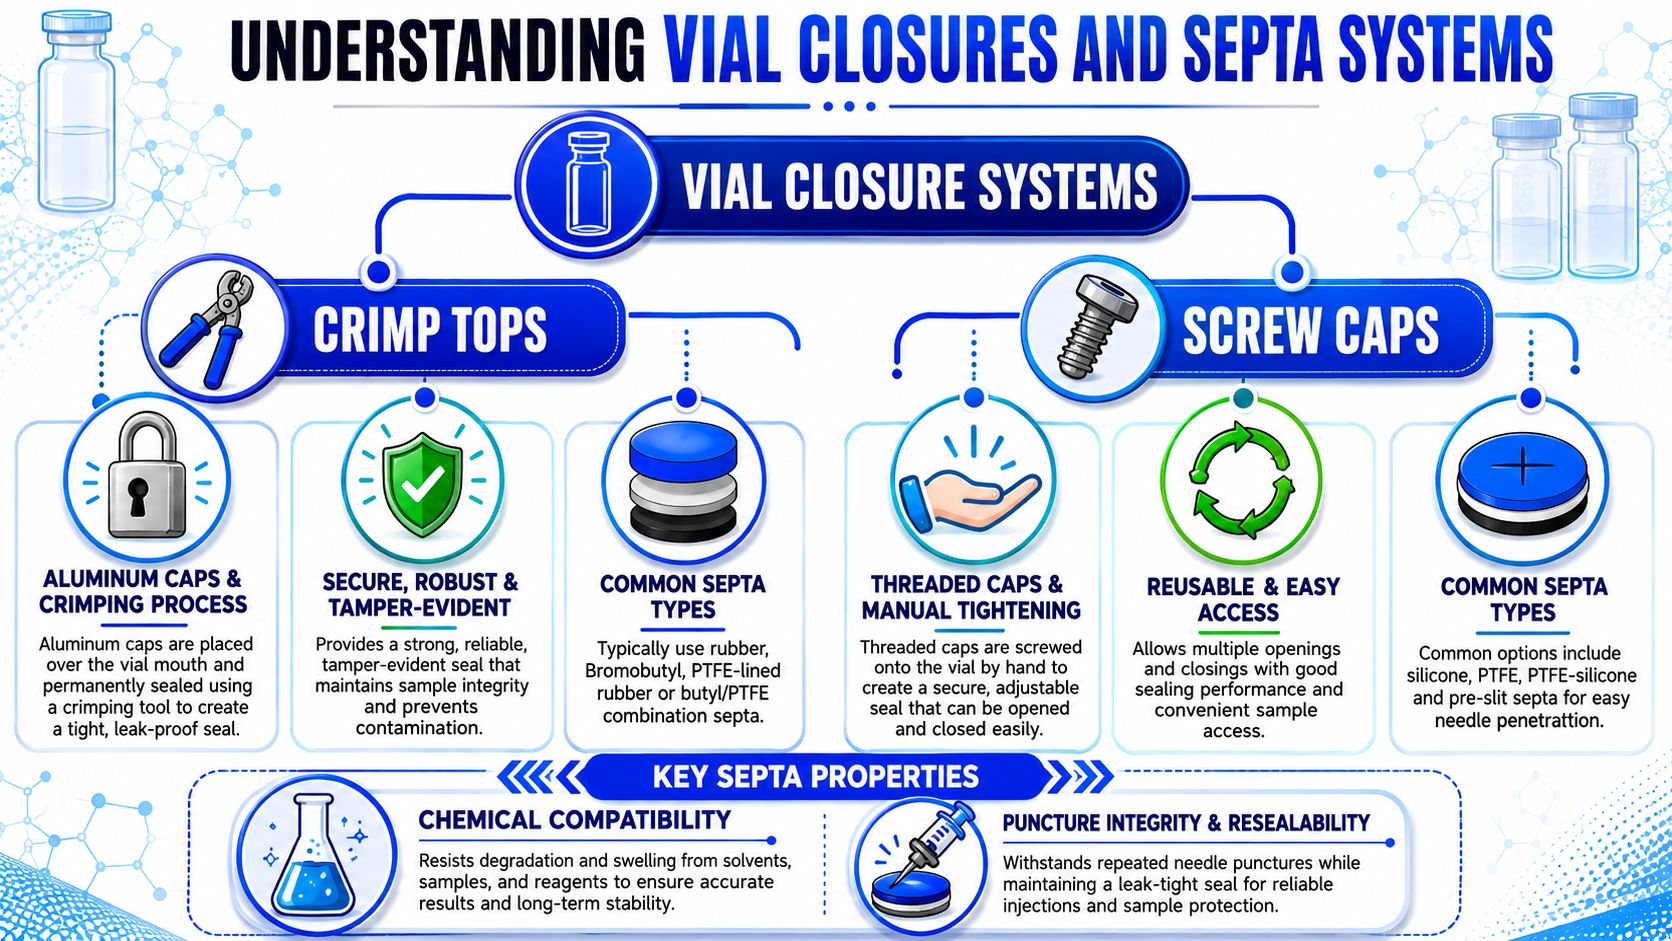
Crimp-top 10 mL glass vials are common when labs want a firm, consistent seal and a vial that can be accessed by needle through a septum. They're often the better choice for serum-style handling, controlled storage, and workflows where tamper visibility matters.
Their trade-off is practical. You need the right stopper, the right cap, and a crimping process that's done correctly. If the crimp is uneven, the seal can be unreliable even if the materials themselves are good.
Crimp systems are strongest when you need:
Screw-cap systems are easier to manage on a bench. They work well when researchers need frequent access without specialized tools, especially for aliquoting, temporary storage, or routine analytical handling.
Their downside is that ease of use can encourage sloppy use. Caps get under-tightened. Liners get overlooked. People reuse caps beyond what the liner can reliably support.
A screw-cap setup makes sense when the work requires:
The choice isn't about which style is “better.” It's about which failure mode you're willing to tolerate.
Here's a quick side-by-side view:
| Closure type | Best fit | Main risk |
|---|---|---|
| Crimp top | Secure seal, puncture access, controlled storage | Bad crimping technique or mismatched components |
| Screw cap | Fast repeated access, flexible routine handling | Inconsistent tightening or liner mismatch |
A short visual explainer can help if your team is onboarding new staff to vial formats and handling decisions:
The septum or liner is where the real detail lives. Material choice affects chemical compatibility, puncture resistance, resealability, and particle shedding risk. If a needle cores the septum or a liner interacts with the solution, the closure becomes a contamination source.
Use a disciplined prep routine:
Inspect every component before assembly
Check the vial lip, stopper or liner surface, and cap for visible defects.
Match the closure to the access method
Repeated puncture needs a different setup than single-fill sealed storage.
Minimize unnecessary handling
The more often you remove caps or touch sealing surfaces, the more variability you introduce.
Treat closures as consumables
If a stopper has been punctured repeatedly or a cap liner looks compressed or distorted, replace it.
A closure system fails gradually before it fails obviously. Most contamination problems start that way.
For peptide work, that gradual failure matters. If the closure introduces inconsistency, you may not see a dramatic leak. You'll see a sample that behaves differently on day three than it did on day one.
Vial selection transitions from a packaging question to an experimental variable.
With peptides and other sensitive materials, researchers need to think in terms of chemical compatibility, not just storage capacity. The vial body, stopper, septum, and liner can all contribute unwanted interactions. Some are obvious, such as visible contamination or seal failure. Others are subtle and far more dangerous because they change the sample without announcing themselves.
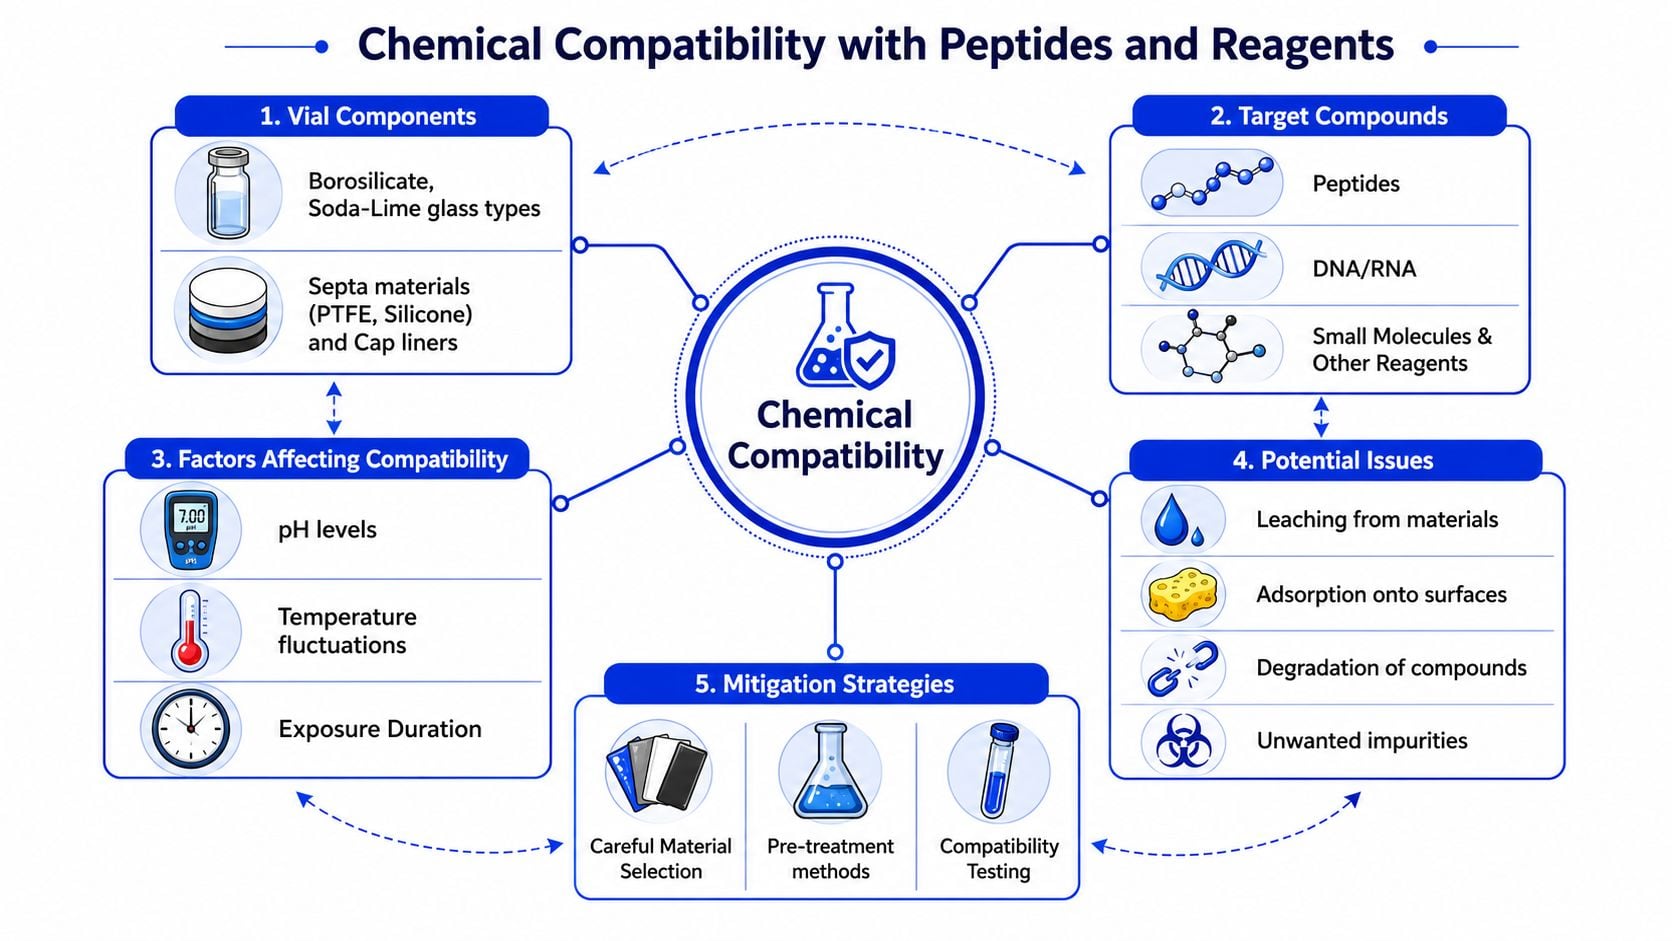
Two concepts matter here: extractables and leachables.
Extractables are compounds drawn from packaging materials under aggressive conditions, such as stress testing or harsh processing. Leachables are the compounds that migrate into the sample under normal or expected use. In a peptide workflow, both matter because they tell you whether the container can alter the solution over time or under processing conditions like autoclaving.
A 2024 Journal of Pharmaceutical Sciences study found that different Type I glass vials showed significant differences in leachable organic and inorganic elements, and that standard Type I vials produced the largest pH deviation after autoclaving along with the highest extractables and leachables profile, as summarized in the study abstract on ScienceDirect.
That's the point many researchers miss. Even within a glass class that is generally preferred, not all vials behave the same way.
When 10 mL glass vials are used for peptide solutions, researchers usually see compatibility issues in a few predictable ways:
pH drift
A small shift can change peptide behavior, solubility, or reproducibility.
Trace-element exposure
Small amounts of inorganic release may not be visible, but they can matter for sensitive assays.
Surface interaction
Some compounds don't remain fully indifferent to the surfaces touching them.
Closure contribution
Septa and liners can add another source of unwanted contact chemistry.
What works is simple in principle, even if it takes discipline in purchasing:
| Risk area | Better practice |
|---|---|
| Sensitive aqueous samples | Choose high-quality Type I borosilicate systems |
| Repeated puncture | Use septa designed for the access pattern |
| Heat exposure | Review packaging performance under sterilization conditions |
| Unknown formulation behavior | Run compatibility checks before using a new vial system broadly |
If a sample is valuable, the vial should be treated as part of the formulation environment.
That mindset changes how labs validate supplies. Instead of asking whether a vial can hold liquid, ask whether it can hold this liquid, under these conditions, without shifting the result.
Good vial selection can still be undone by poor post-fill practice.
Sterilization, handling, storage, shipping, and labeling are where disciplined labs separate themselves from labs that are always troubleshooting preventable drift. A solid vial system supports sample integrity. Bad technique erodes it.
The first mistake is assuming that because the vial is glass, the entire assembled package is ready for any sterilization approach. It isn't. The glass may tolerate a process that the stopper, liner, or cap assembly does not tolerate well.
In practice, match the sterilization method to the full system:
For teams that need a general refresher on sterile processing principles and equipment cleaning workflows, this overview from VirusFAQ.com on medical equipment is a useful operational reference.
Once filled, the vial enters its longest risk window. Researchers focus on preparation day, but many problems show up later because storage conditions were casual or labels were incomplete.
Use these habits consistently:
Protect from light when needed
If the compound is light-sensitive, use amber glass rather than relying on secondary packaging alone.
Control access frequency
If a vial will be opened or punctured repeatedly, plan aliquots instead of using one container until it degrades.
Label for traceability
Include sample identity, preparation date, solvent or buffer, concentration, operator initials, and any storage conditions that matter to the next person handling it.
Stabilize for transport
Ship in packaging that prevents impact, cap loosening, and label damage. A good vial can still fail if it knocks against hard surfaces in transit.
Inspect before use, not just after fill
Check for evaporation signs, closure deformation, residue around the seal, or unclear labeling before putting the sample back into a workflow.
A single mislabeled or poorly stored vial can waste far more time than the vial ever cost.
Clean handling is only half the job. Traceable handling is what lets a lab trust its own inventory later.
When labs get storage discipline right, they don't just protect samples. They protect decisions based on those samples.
Buying 10 mL glass vials gets easier once you stop shopping by capacity and start shopping by application.
The strongest buyers ask precise questions before they place an order. They don't assume the listing title tells them enough, and they don't treat documentation as optional. That approach matters because the same nominal format can still differ in glass quality, dimensional consistency, closure compatibility, and supporting records.
Before purchasing, ask the supplier these questions:
What glass class is this vial made from
If the work involves sensitive peptides or aqueous reagents, the answer shouldn't be vague.
Is the vial molded or tubular, and what standard does it follow
Dimensional consistency matters if you need reliable closure fit.
What closure system is it designed for
Ask whether it is intended for screw-cap use, stopper-and-crimp use, or a pre-assembled format.
Is it sterile, depyrogenated, or just clean-packaged
Those are different conditions, and buyers shouldn't collapse them into one.
Is it clear or amber, and why would one be preferred for this use case
Light sensitivity should be part of the decision, not an afterthought.
A good cross-check is to compare how other packaging sectors present quality and material options. Looking at a broad catalog of premium glass bottles can help buyers sharpen their eye for finish style, color, access method, and packaging fit, even though laboratory requirements are more demanding.
High-quality 10 mL glass vials are specified to meet standards such as ISO 8362 and USP <660>. In one documented 10 mL tubular batch, the vials were reported to pass dimensional, appearance, and chemical-performance checks while meeting YBB00302002-2015, USP<660>, and EP 3.2.1 acceptance criteria. That batch reported internal stress at 0 nm against a limit of ≤40 nm, and heavy-metal release remained below limits for As (<0.10 mg/L), Sb (<0.05 mg/L), Pb (<0.030 mg/L), and Cd (<0.010 mg/L), according to the referenced quality document for a 10 mL vial batch.
That kind of documentation is what separates a supply item from a controlled input.
Use this final screen before buying:
If the supplier can't clearly explain what the vial is, the lab shouldn't trust it with a valuable sample.
For researchers who care about traceability across the whole workflow, not just the container, Peptide Warehouse USA is worth exploring. The company supplies research-use peptides and related compounds with batch documentation, third-party reporting, and a USA-based sourcing approach that fits labs looking for clearer procurement and better consistency. Learn more and review the available options before your next order.