No products in the cart.

A vial of lyophilized peptide looks simple until you have to turn it into a usable solution without damaging it, contaminating it, or making the concentration impossible to trust. That pressure is real. A poor reconstitution decision at the bench can undermine everything that follows, from assay consistency to storage stability.
A reconstitution solution for injection is the sterile diluent used to bring a dry injectable powder into solution. In peptide research, that first choice matters more than many new researchers expect. The right diluent supports solubility, handling, and repeatability. The wrong one can leave you with clumps, haze, excess vial access, or a concentration that creates avoidable dosing errors.
Lyophilization exists for a reason. Some compounds don't remain stable long enough in liquid form to be distributed that way, so manufacturers package them dry and direct clinicians or researchers to add a sterile diluent immediately before use. If you're comparing protocols, handling standards, or broader peptide therapies, it helps to understand that reconstitution isn't a niche lab trick. It's a standard part of injectable preparation with direct implications for stability, sterility, and traceability.
The first technical mistake in peptide work usually isn't dramatic. It's a quiet one. The wrong diluent, rushed mixing, poor labeling, or a vial that's used again later even though the solution never fully cleared.
That's why reconstitution deserves more respect than it usually gets. You're not just adding liquid to powder. You're defining the final concentration, the handling burden, the storage path, and the contamination risk in one move.
In practical terms, lyophilization keeps sensitive material in a dry state until the moment of use. Some injectable drugs are packaged this way because they don't stay stable long enough in solution form for distribution, and standard clinical diluents include sterile water, sterile normal saline, bacteriostatic water, and sometimes 5% dextrose in water depending on the label directions. One clinical summary notes that about 25% of parenteral drugs worldwide require reconstitution before use (Osmosis drug reconstitution principles).
Dry peptide vials are easier to ship and store than unstable liquid formulations. That doesn't make reconstitution a routine box-checking exercise. It means the researcher takes on part of the stability burden at the moment of preparation.
| Solution Type | Composition | Primary Use Case | Key Consideration |
|---|---|---|---|
| Sterile Water for Injection | Sterile water without preservative | Single-use preparation when the protocol allows it | Often better suited to immediate or limited-use workflows |
| Bacteriostatic Water | Sterile water with preservative | Repeated vial access in multi-use workflows when compatible | Preservative content can affect suitability for some formulations |
| Normal Saline | Sterile sodium chloride solution | Protocols that specifically require saline | Osmolality and compatibility differ from water-based options |
| 5% Dextrose in Water | Sterile dextrose solution | Used only when the product directions specify it | Not a casual substitute for water or saline |
Sterile Water for Injection is the simplest place to start. It has no preservative, so it avoids one layer of compatibility concern. The trade-off is obvious. Once you've punctured and mixed, your margin for repeated handling is narrower.
Bacteriostatic Water appeals to researchers running multi-withdrawal workflows because the preservative can support practical usability after the vial is entered. That doesn't mean it's always the best answer. If a peptide or formulation is sensitive, the preservative becomes part of the compatibility question, not just a convenience feature.
Normal Saline enters the picture when the formulation or protocol specifically calls for it. This isn't interchangeable with sterile water because both are sterile liquids. Saline changes the environment around the dissolved material, which can affect handling and compatibility in ways that matter at the bench.
Follow the product directions first. If the protocol names a diluent, that choice is already made.
5% Dextrose in Water is the option many researchers ignore until a protocol requires it. It belongs in the comparison because it shows the broader point. Diluent choice isn't only about "water versus saline." It's about the chemical environment your peptide enters after reconstitution.
The most useful way to think about a reconstitution solution for injection is as a decision about fit, not preference. New researchers often ask which diluent is "best." The better question is which one matches the formulation, the handling pattern, and the storage plan.
Authoritative guidance is consistent on one point. The diluent has to be selected from the product's instructions because the choice can affect stability, osmolality, and usability (discussion of reconstitution decision factors). That sounds basic, but it's where many avoidable errors begin.
If the vial insert or validated protocol specifies sterile water, saline, bacteriostatic water, or another diluent, don't improvise. A peptide that behaves well in one vehicle may clump, precipitate, or become harder to interpret in another.

A clean way to decide is to ask four questions before you draw anything into a syringe:
For example, a short single-session workflow may fit well with sterile water when the protocol allows it. A longer research schedule with repeated withdrawals often pushes researchers toward a more conservative contamination-control mindset, which is why many labs keep Bacteriostatic Water available as a standard supply item for compatible applications.
The first bad habit is choosing the diluent based on whatever is already on the shelf. That's backwards. Availability matters, but compatibility matters more.
The second is over-concentrating a vial to make small withdrawals easier. That can work, but it can also turn reconstitution into a solubility problem.
Bench rule: If your concentration target makes the powder reluctant to dissolve, the "convenient" math has already become an experimental liability.
The third error is treating multi-use handling as if it were just single-use repeated several times. It isn't. Every vial access is another contamination opportunity, another chance to warm the vial, and another chance to mislabel or miscalculate.
Sterile technique begins before the stopper is pierced. If your workspace is cluttered, if your labels aren't ready, or if you're still deciding how much diluent to add after the syringe is filled, you're already creating avoidable risk.
Gather the vial, chosen diluent, sterile syringe, sterile needle, alcohol swabs, labels, and a clean surface. Decide the final concentration in advance. Write it down before you start.
Clinical handling guidance emphasizes that the final concentration depends on the exact diluent volume added, and the process typically involves drawing up the solvent, injecting it into the vial, and gently rolling or agitating until dissolution is complete. The same guidance also notes that multi-dose handling requires documentation of the date and time of reconstitution, the expiration date and time, the dosage strength, and the preparer's initials for traceability, with storage recommendations such as 4°C for short-term use and -20°C or -80°C for longer-term storage in peptide workflows (Arpovo reconstitution handling overview).

A clean setup usually includes:
Swab the stopper of both vials and let the alcohol dry. Draw the calculated amount of diluent into the syringe without touching sterile surfaces. Then inject slowly.
Aim the stream down the inner wall of the peptide vial rather than blasting directly into the powder cake. That simple change reduces foaming and gives the powder a better chance to wet gradually instead of forming stubborn clumps.
A quick visual reference can help if you're training someone new on the bench:
Once the diluent is in, resist the urge to shake. Peptide reconstitution guidance recommends slow solvent addition, allowing 15–30 minutes for complete dissolution, and avoiding vigorous shaking because it can promote aggregation or degradation. If the final solution isn't clear, that may signal contamination, aggregation, or precipitation (peptide reconstitution troubleshooting guidance).
Gently swirl, roll, or rock the vial. Then leave it alone long enough to finish dissolving. Many failed reconstitutions are really just rushed reconstitutions.
A vial that looks almost clear isn't done. Wait until you can inspect it without guessing.
Finish by labeling immediately. Don't trust memory later in the day.
The math doesn't need to be complicated.
If you have a 5 mg vial and add 2 mL of diluent, the concentration is:
5 mg / 2 mL = 2.5 mg/mL
From there:
If you have a 10 mg vial and add 4 mL, the concentration is also 2.5 mg/mL. Different vial size, same final concentration.
That matters because consistent concentration planning lets different peptides fit the same withdrawal logic across a study. It reduces arithmetic mistakes during repeated handling.
Concentration errors don't start with hard math. They start with skipped notes, unlabeled vials, and decimal assumptions. The best reconstitution work is boring to review because every number is traceable.
Use this every time:
Concentration = amount of peptide in vial / total volume of diluent added
If the vial contains peptide mass in milligrams and you add volume in milliliters, your answer is mg/mL.
Examples:
The formula is simple. The discipline is in using the actual volume added, not the volume you intended to add.
Once you know the concentration, you can calculate the volume needed for any target amount.
Withdrawal volume = target amount / concentration
If your solution is 2.5 mg/mL and you need 0.5 mg, then:
0.5 mg / 2.5 mg/mL = 0.2 mL
If your solution is 2 mg/mL and you need 1 mg, then:
1 mg / 2 mg/mL = 0.5 mL
Researchers make fewer mistakes when they convert the whole vial into an easy reference chart at the time of mixing. That can be as simple as writing three or four common withdrawal points directly on the vial label or in the lab notebook.
Critical warning: Never recalculate from memory after repeated vial access. Use the documented concentration and prewritten withdrawal equivalents.
Calculation accuracy only helps if the solution stays usable after mixing. Pair the math with a handling routine:
A strong peptide workflow treats concentration, storage, and sterility as one system. Separate them, and accuracy starts to drift.
The vial is mixed. The job still isn't finished. Post-reconstitution handling is where good bench work either holds its value or unravels.
Some reconstituted products are meant to be used as soon as possible. Others tolerate a short storage window if handled correctly. Peptide workflows often use 4°C for short-term storage and -20°C or -80°C for longer-term storage, with repeated freeze-thaw cycles avoided because they can compromise solution quality, as noted earlier in the clinical handling guidance.
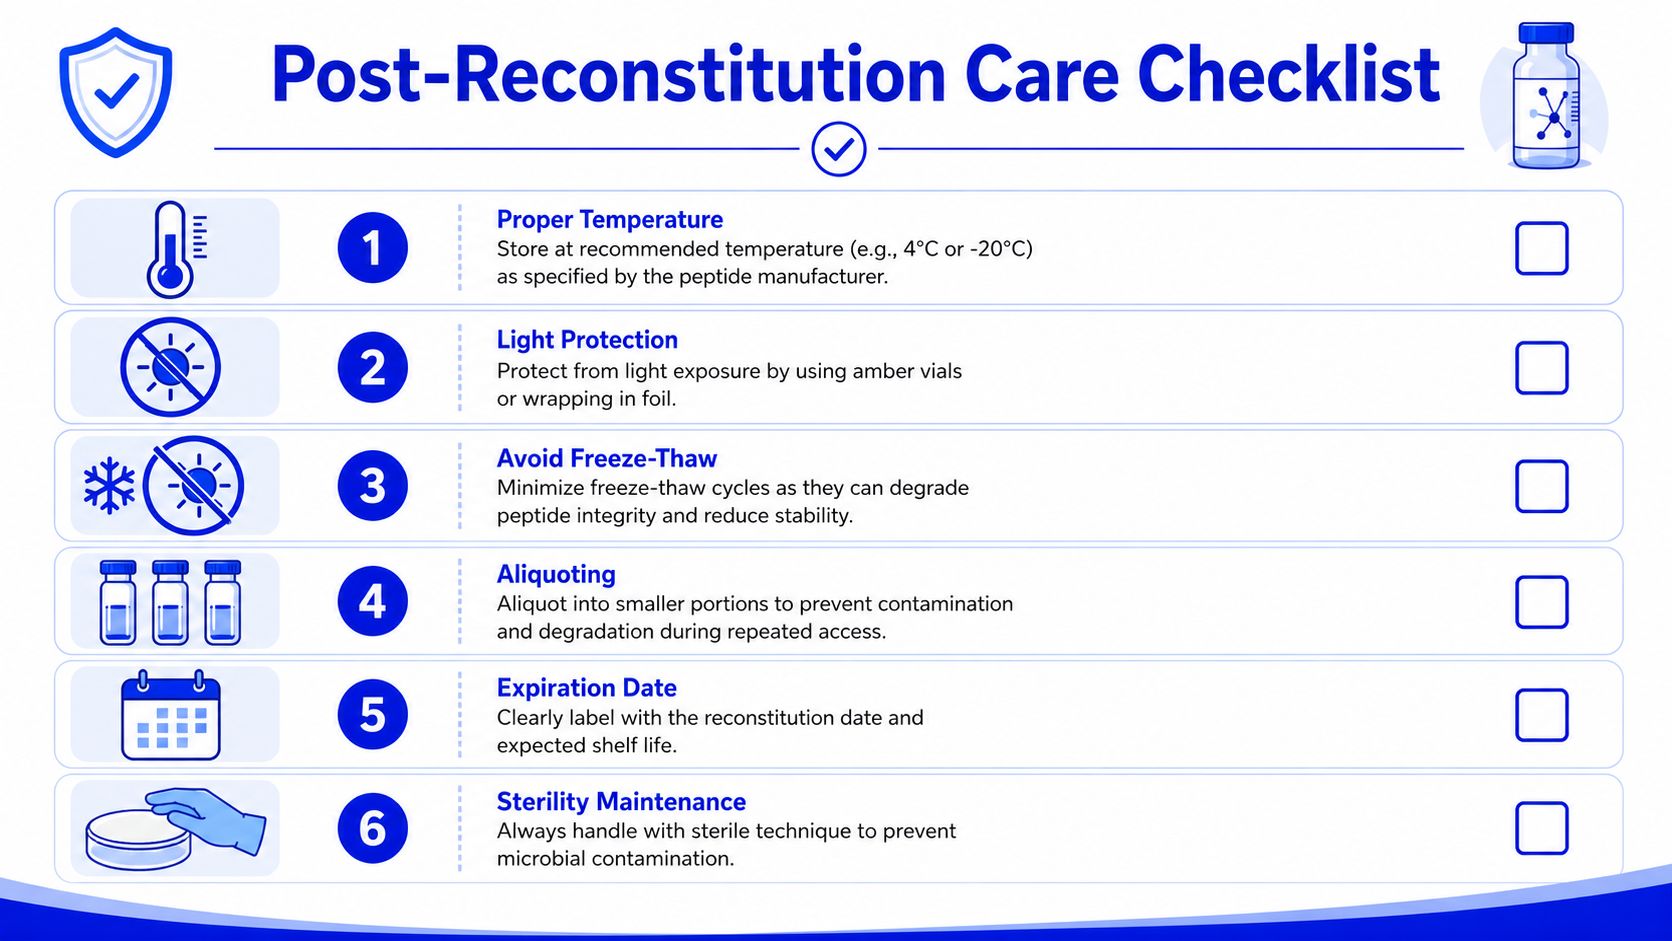
Practical storage habits matter more than abstract "best practices":
A reconstituted solution should look resolved, not questionable. Manufacturer-facing instructions often specify that the product should remain clear to slightly opalescent and colorless, and visible particles or cloudiness are reasons not to use it (post-reconstitution appearance guidance from RCH ELOCTATE card).
Use a repeatable inspection routine:
If the solution turns cloudy, develops visible particles, or no longer looks the way it did when freshly prepared, discard it.
New researchers often hesitate here because the vial may represent cost, time, or scarce material. That hesitation causes bad decisions.
Discard the vial if:
What doesn't work is trying to reason your way past visible evidence. A compromised solution doesn't become acceptable because the schedule is tight.
Research integrity shows up in small actions. It shows up in using the specified diluent instead of guessing, in choosing a workable concentration instead of an impressive one, in letting a vial dissolve fully, and in discarding material that no longer meets visual or handling standards.
A reliable reconstitution solution for injection supports that discipline, but it doesn't replace it. Sterility, documentation, calculation accuracy, and storage control all sit in the same chain. If one link is weak, your confidence in the material should be weak too.
This is especially true in peptide work, where failures often look minor at first. A little foaming. Slight haze. An unlabeled vial that someone swears was mixed yesterday. Those are not small issues in a controlled workflow. They're warnings.
Good technique protects the experiment before it protects convenience. Keep the process simple, documented, and repeatable. That's how new researchers become dependable ones.
If you're sourcing research-grade materials and want a supplier built around traceability, batch documentation, and laboratory use, explore Peptide Warehouse USA for high-purity peptides and related research supplies. Learn more about their catalog, review available documentation, and explore options that fit a disciplined research workflow.
Leave a comment