No products in the cart.


You've got the vial on the bench, the paperwork is half-read, and the next decision matters more than most beginners think. How to use peptides starts long before an injection, because the workflow is about source verification, reconstitution chemistry, storage, and route selection, not just what goes into a syringe. If you handle peptides like interchangeable supplements, you risk wasting material, losing stability, or trusting a compound that never had meaningful human data in the first place.
A new shipment lands, the label looks professional, and the temptation is to treat every peptide the same. That's the first mistake to avoid. Peptides are short chains of amino acids, with WebMD describing them as roughly 2 to 100 amino acids and Medical News Today describing them as typically 2 to 50 amino acids long, a size range that helps explain why they behave differently from full proteins and why their handling is so specific. WebMD's peptide overview gives the basic biochemical definition, and that definition is the starting point for every practical decision that follows.
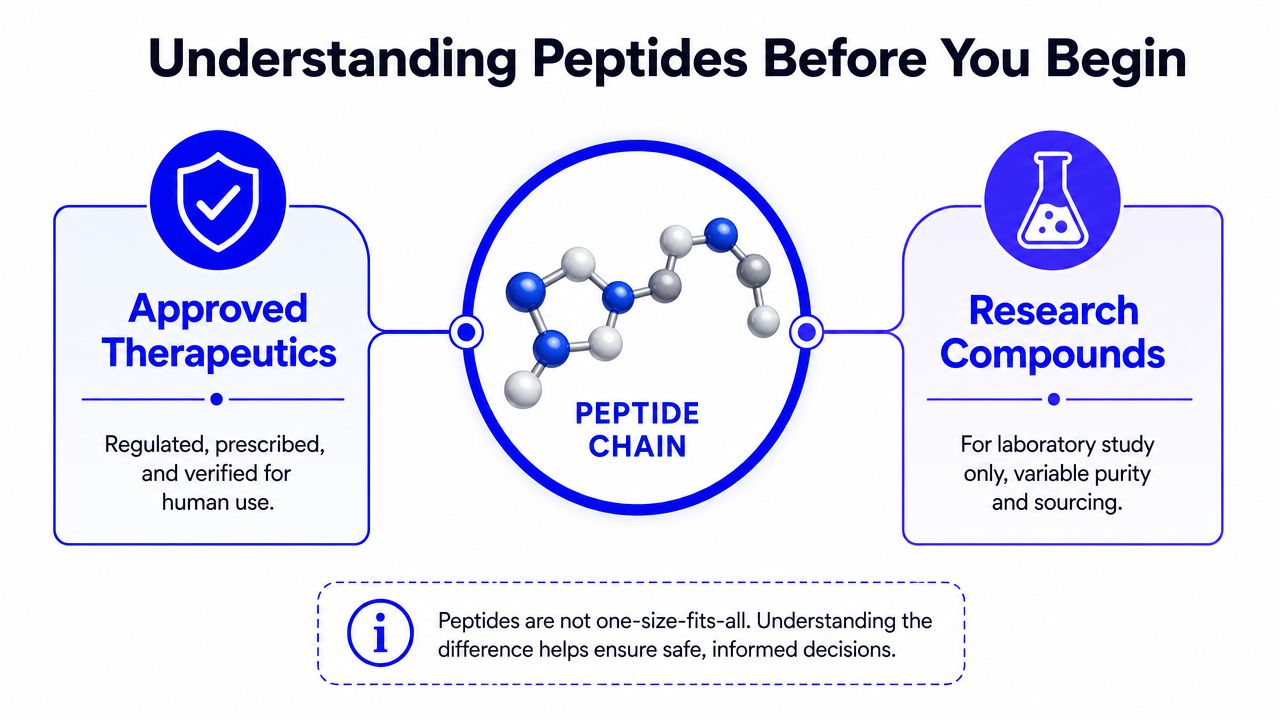
The history is important here. Peptides have been used in medicine for about 100 years, and modern peptide therapeutics now include more than 80 approved peptide drugs worldwide, with roughly 140 peptides in clinical trials and many more in preclinical development, according to Harvard Health's review of peptide safety and benefits. Harvard Health's peptide discussion also makes the key point that evidence in people is uneven, especially for unregulated injectable peptides.
That distinction changes how you read every COA, every product page, and every protocol. FDA-approved peptide drugs come with regulatory review and human data. Research-only or online products may not, and Harvard Health notes that evidence in people for unregulated injectable peptides is largely absent and safety isn't well established.
Practical rule: Don't start with the route of use. Start with the status of the compound.
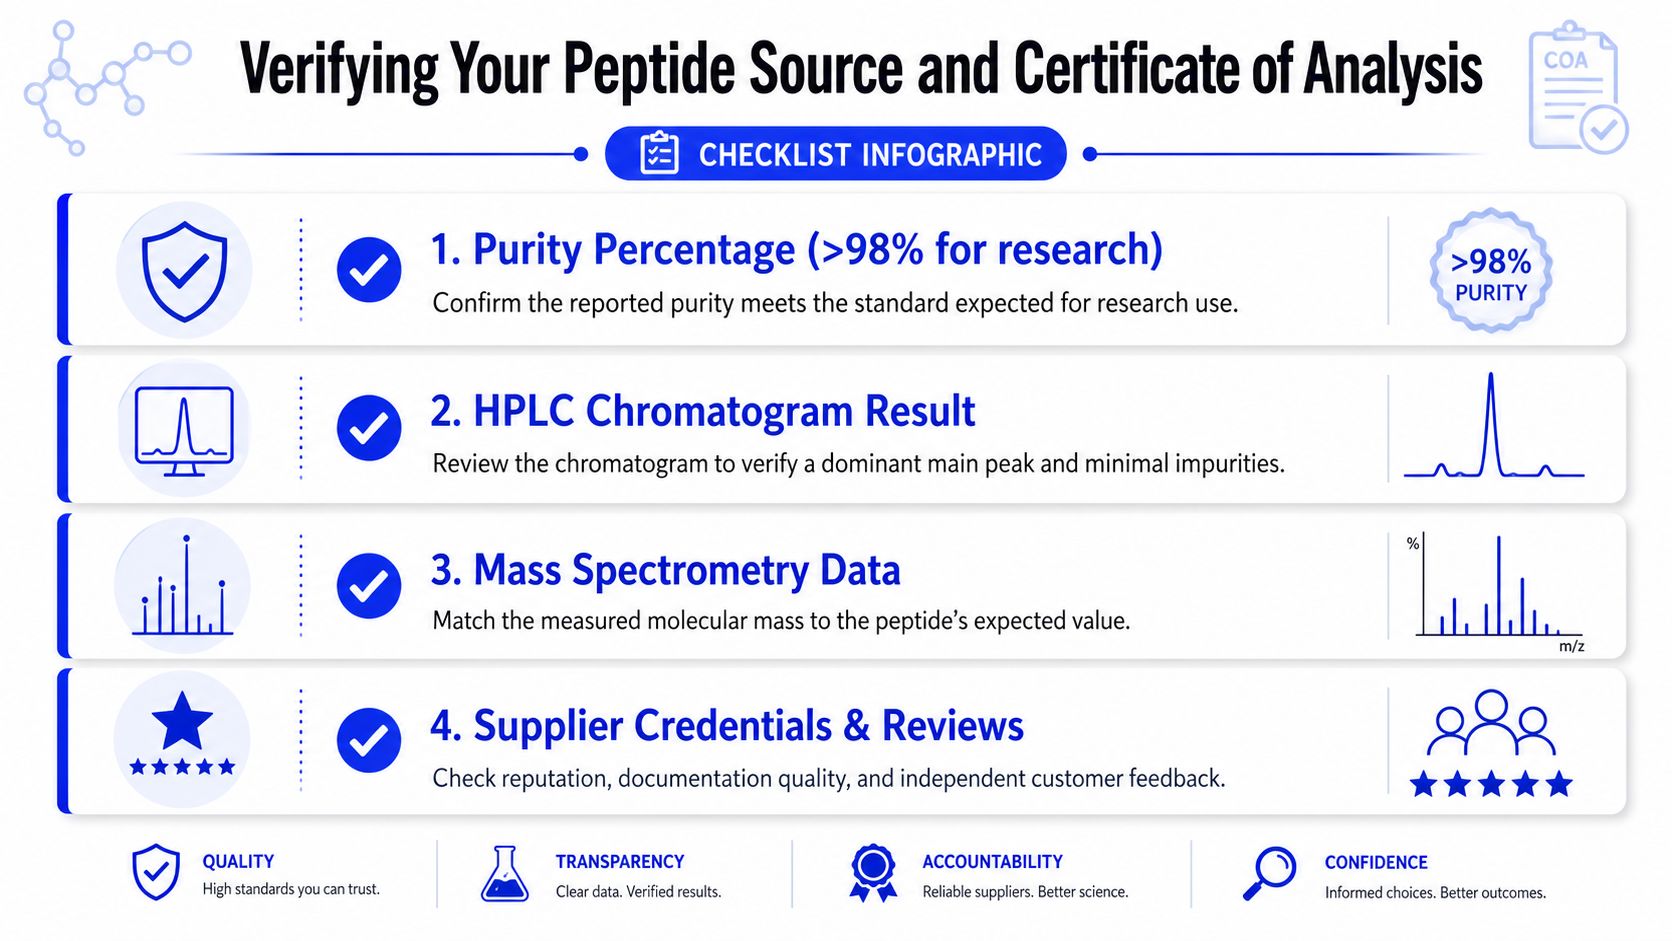
A peptide can look clean and still be the wrong material, the wrong batch, or a poorly documented lot. That's why source verification comes before opening the vial. An independent research discussion on peptide sourcing recommends checking batch numbers, purity percentage, and testing methods such as HPLC or mass spectrometry before trusting a supplier, and it warns against suppliers that can't provide documentation. This peptide research discussion is useful here because it reflects the exact questions that experienced buyers ask before they spend time on a sample.
A credible Certificate of Analysis should let you tie the vial to a specific lot and confirm how that lot was tested. If the paperwork is vague, generic, or detached from the vial you received, treat that as a red flag.
A missing COA is a problem. So is a COA that lists purity without explaining how the result was measured. A supplier may also publish polished product copy while giving you no batch-level evidence, and that gap matters more than the wording on the homepage.
Lab habit: If the documentation doesn't let you connect the vial to a testable batch, you don't really have documentation.
The safest workflow is simple. Verify the source, check the batch, confirm the analytical method, and only then move to reconstitution. That sequence protects your time as much as your material, because a compromised lot wastes every downstream step.
A vial that looks stable on the bench can still be lost in the first minute of reconstitution. Lyophilized peptides tolerate handling better than a liquid solution, but the wrong solvent choice, poor wetting, or hard agitation can leave you with foam, clumps, or persistent cloudiness. For research-use peptide reconstitution, start with the vial and diluent at room temperature, disinfect the stoppers, add solvent slowly down the vial wall, and gently swirl rather than shake. That routine limits foaming and aggregation, and it gives the powder cake time to wet evenly before you decide whether the sample is dissolved.
Sidewall addition changes how the liquid meets the powder. It spreads the solvent across the glass instead of driving a jet straight into the pellet, which helps the material wet more evenly and reduces the clump that forms when one spot is flooded. After addition, let the vial sit long enough for the solution to clear, because visible particles and haze usually mean the process is still incomplete. Expert peptide handling guidance reinforces that handling sequence because it reduces avoidable loss at the bench.
A few errors show up again and again:
The technician's job is to respect the visual check. A clear solution is the target, and a partly dissolved sample is not ready just because the timer ran out.
Some peptides dissolve cleanly in simple aqueous diluents. Others need a different medium before they will go into solution at all. NIBSC's peptide storage and handling note notes that dissolution can improve with additives such as acetonitrile, ethanol, DMF, DMSO, or chaotropic salts like guanidine hydrochloride or urea. That matters because the solvent is part of the protocol, not a neutral background choice.
A vial that stays cloudy after careful mixing is usually telling you something useful. The issue may be solvent compatibility, peptide sequence behavior, or the need for a different reconstitution medium, not just a bad batch. A practical bench check is to compare the physical response of the sample to the solvent you chose, then adjust the medium before you force the material with harsher handling.
Once the peptide is fully dissolved, the work shifts from handling to recordkeeping. The concentration has to match the planned protocol, and the storage plan has to protect the material from avoidable degradation. No fixed dosing standard is given here, so the practical step is to calculate from the vial label and the final volume you prepared, then write it down before the solution leaves the bench.
A clean calculation log prevents quiet errors later. Record the amount in the vial, the volume you added, and the working concentration you ended up with. If you are preparing aliquots, label each tube immediately with the peptide name, lot number, date, and concentration. Unlabeled material creates avoidable confusion, especially when someone else has to sort out what was prepared and how it was intended to be used.
A simple bench record usually covers the parts that matter:
Storage comes next, and it should be treated as part of the protocol rather than a cleanup step. After mixing, solutions are usually handled under refrigerated conditions, and the way they are stored depends on the peptide and solvent system. That is why the handling note from NIBSC's peptide storage note matters in practice, because peptide integrity depends on what happens after reconstitution, not just during it.
Operational rule: Freshly prepared solutions are safer to handle than mixed syringes left for later use.
That rule has a direct bench consequence. Mixed peptide syringes should not be preloaded or stored casually, because prepared solutions are more likely to lose stability or sterility when they sit without a clear handling plan. In a research workflow, prepare only what you can use responsibly, then keep the remainder in a documented, controlled format that matches the peptide and solvent you selected.
| Peptide State | Temperature | Typical Stability | Key Considerations |
|---|---|---|---|
| Lyophilized powder | Controlled room or refrigerated storage, per supplier guidance | More stable than solution | Keep dry, protect from moisture, verify vial integrity |
| Reconstituted solution | Refrigerated storage after mixing | Varies by peptide and solvent | Minimize handling, label clearly, avoid repeated warming |
| Aliquoted solution | Refrigerated or frozen handling, depending on protocol | Better than repeatedly accessed stock | Reduce freeze-thaw stress, use clean aliquots, document each access |
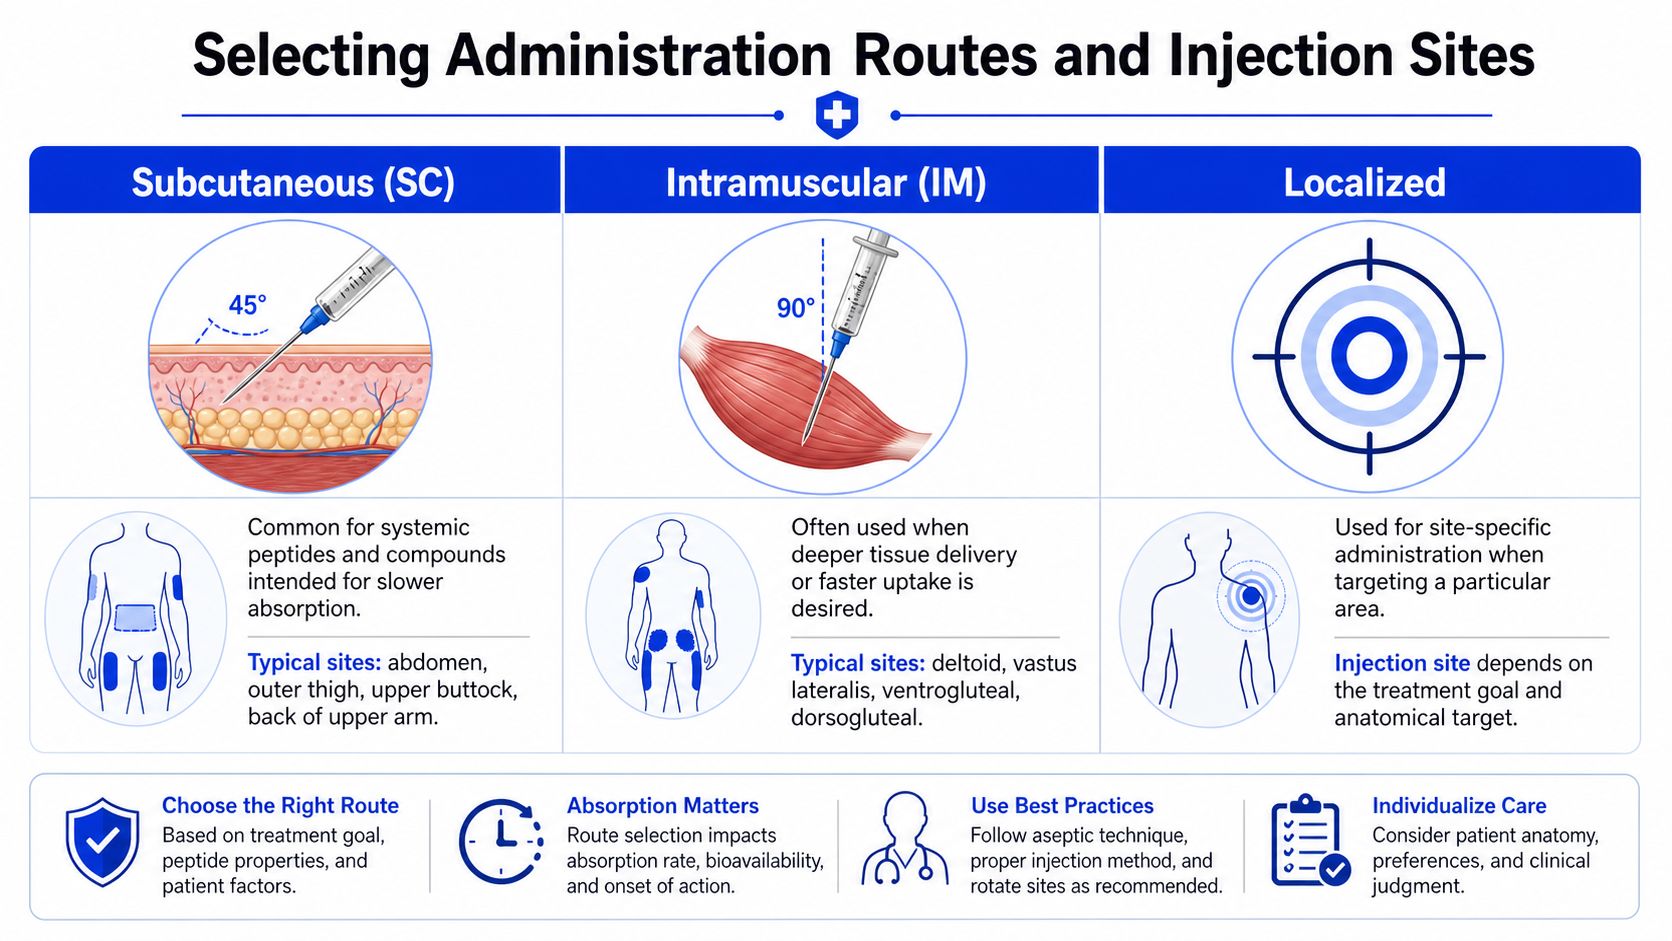
A peptide protocol can fail at the handling stage long before it reaches a syringe. Route selection, solvent behavior, and the local tissue response all shape whether an injection is workable for the specific compound in front of you. Subcutaneous, intramuscular, and localized administration each solve a different problem, so the route should follow the research goal, not a habit copied from another peptide.
For many protocols, the first question is simple: where does the compound need to act? A standard subcutaneous injection in the abdomen or thigh may fit one study, while another calls for a more localized placement near the target tissue. That distinction matters because a peptide-specific guide on BPC-157 discusses subcutaneous administration in a deltoid fat pad near the painful structure, which shows that site choice can be tied to the model rather than a generic body map. This peptide injection guide is a useful reference for that kind of route and purpose matching.
Technique still matters, and small errors show up fast at the bench. Use a fine-gauge insulin syringe to limit discomfort and improve control. Pinch a small fold of skin to create a stable subcutaneous pocket, then insert at a shallow angle that matches the tissue layer instead of forcing the needle too deep. Deliver the solution slowly, because fast injection tends to increase local irritation. Do not rub the site afterward, and rotate injection locations so the same area is not repeatedly stressed, hardened, or scarred.
The route alone does not tell you whether the protocol is sound. It only tells you how the material is being delivered. Evidence for many site-specific claims remains limited, so administration mechanics should stay separate from biological claims about what the peptide will do once it reaches tissue.
If a protocol cannot explain why a specific route was chosen, the route is probably being copied, not reasoned through.
That is the standard I use in practice. Match the route to the study design, document the site and volume, and note any local reaction so the next run starts from observed handling data instead of assumption. The image below is a quick visual reference for how subcutaneous, intramuscular, and localized routes differ in practice.
A vial can look clean and still be a poor choice for handling. In peptide work, the key risk is trusting an unregulated product that appears legitimate but does not meet basic purity or safety expectations. The American Society of Plastic Surgeons reports that independent testing has found heavy metal contamination, including arsenic and lead at up to 10 times acceptable injectable limits, and also bacterial contamination capable of causing sepsis. ASPS's peptide safety article makes that contamination problem concrete, which is why source verification is not optional.
According to Columbia Doctors' peptide overview, synthetic peptide use in humans is still in its infancy, and much of the available research comes from laboratory or limited animal studies rather than rigorous human trials. As NPR reported, many peptides sold for wellness are experimental and their claimed benefits remain unverified. That combination should keep any buyer cautious, especially when the product is being sold outside tightly regulated channels.
For compliance-minded research handling, keep these rules in mind:
The right attitude is discipline. When a product cannot show clear sourcing and analytical documentation, stepping back is the correct call. You protect the work, and you protect everyone who handles it.
The cleanest peptide workflow is boring, and that's a compliment. Verify the source, read the COA, reconstitute slowly, confirm clarity, store carefully, select the route with intent, and document every step. If the vial doesn't dissolve cleanly, stop and troubleshoot the solvent system before you assume the sample is bad.
What if the peptide won't fully dissolve? Recheck temperature, mixing method, and solvent choice. NIBSC notes that additives such as DMSO, DMF, acetonitrile, ethanol, guanidine hydrochloride, or urea can change dissolution behavior, so stubborn cloudiness may be a solvent issue rather than a failed batch.
Should mixed syringes be saved for later? Guidance warns against it. Freshly prepared solutions are less likely to lose stability or sterility than syringes that have been preloaded and stored.
What matters most before use? The source and documentation. If the COA, batch number, and testing method don't line up, the rest of the workflow is built on weak ground.
How should I think about benefits of peptides? Focus on the difference between approved therapeutics and experimental compounds. The benefits of peptides depend on the specific molecule, the evidence base, and whether the material is suitable for the intended use.
If you're building a research inventory and want a cleaner starting point, explore Peptide Warehouse USA for US-made research peptides with batch testing, COAs, and documented sourcing. Visit Peptide Warehouse USA to review the catalog and choose compounds that fit a careful, research-only workflow.